
Last year, while attending the Huntsman World Senior Games, I felt inspired to make a little doggie coat for my friends dog, Sunny. They live in Arizona so they are used to the extreme heat temperatures. St. George, UT, where the Senior games are played, doesn’t have quite the extreme temps that AZ has in October. Though it’s usually rather pleasant temps in St. George that time of year….. it is still colder than Arizona.
Poor little Sunny pup seemed to shiver a little, especially during the morning games when the temp is about 20 degrees cooler than it is later in the day. Hence….. I went to work designing a little coat for Sunny to keep her warm!
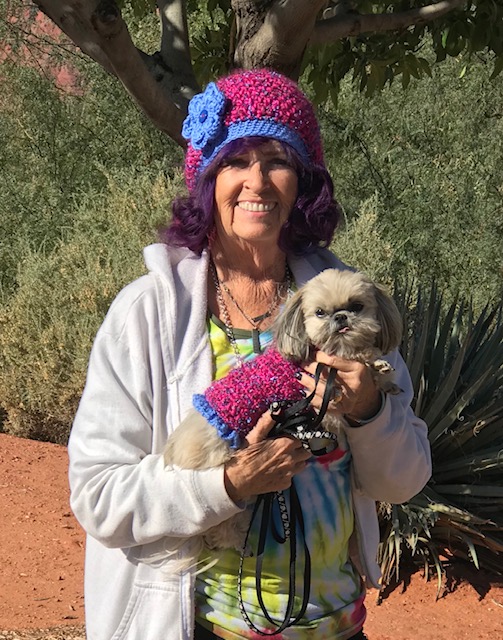
This pattern is the result of that work! And as you will see from the pictures…. it also lead to making her Mom a matching hat! (See Hat pattern links at the bottom of this post)
Sunny is a rather small dog, so this pattern is designed to fit a small dog, though it could easily be altered for a larger dog. When I measured Sunny, I took her Neck, Chest measurements and the length from her neck area to just before where her hind legs are. Those are the measurements I used to create the pattern. I think the design could be altered with more width and length to accommodate a larger dog.
A trip to the craft store lead me to a terrific yarn that was used for the first coat I made her. Yes…. since her Mom is a Fashionista….. many more coats followed! (I will follow with tips on adding the novelty yarn later) The yarn used for the original coat design is Isaac Mizrahi Carnegie Hill yarn in the color way Merriweather. It’s a Bulky weight fun novelty yarn with a colorful metallic thread running through it. I trimmed it with Caron Simply Soft yarn in Berry Blue. I love the combo and Sunny looks adorable in it!

I hope you enjoy the pattern! I will follow with another post on how to adapt this pattern using a worsted weight yarn.
(You can find more pictures of the step by step process below the pattern using a different yarn)


Miss Sunny’s Doggy Coat Pattern:
Materials Used:
6mm/ J hook (body of coat and trim)
4mm/ G hook (optional ruffled edge and rosettes)
Bulky yarn (5 weight)
Worsted weight yarn for trim
4 flat buttons
Thread and Needle (for buttons)
Tapestry (needle for sewing in ends)
Stitch Markers
Stitches Used:
Chain (Ch)
Half Double Crochet (HDC)
Half Double Crochet Decrease (HDC decrease)
Slip Stitch (sl st)
Single Crochet (SC)
Double Crochet (DC)
Stitch (st)
LET’S BEGIN!!
Coat Base Instructions:
(It’s a good idea as you make your button hole rows (1st and last row and middle row (row 6) to double check and make sure they are all on the same side. If your row count is correct, it should work out, but it never hurts to double check!)
Using 6mm/ J hook, Ch 35
Row 1- HDC in 2nd chain from hook. HDC across till last three chains, HDC in next chain, Ch 1, skip 1 Ch and HDC in last Ch. This creates the first button hole (34 st)
Row 2- Ch 1, turn, HDC in each stitch across till you reach the Ch St. HDC in the Ch st, HDC in last HDC (34 st)
Row 3-5, Ch 1, turn, HDC across (34 st)
Row 6- Ch 1, turn, HDC in each stitch across till last 3 st. HDC in next stitch, Ch 1, skip 1 st, HDC in last st. Second button hole made. (34 st)
Row 7-10 – Repeat Rows 2-5
Row 11- Repeat Row 6 and tie off. Third button hole made
Coat Mid Section Instructions:
Using a Stitch marker, find the center of the coat base and mark with Stitch marker. Count out 7 stitches to the right and mark that stitch with another Stitch marker. Repeat to the left. Remove center stitch marker.
Row 1 – Attach yarn with a Slip Stitch to the stitch marked by Stitch marker on the right. HDC in same stitch. HDC in each stitch across to the next stitch marker. (15 st)
Row 2-5 – Ch 1, turn, HDC in each stitch across (15 st)
Row 6- Ch 1, turn, HDC in each stitch across, at end of last stitch, Ch 9 and tie off (These chains will help create the neck band)
Neck Band Instructions:
Row 1- Attach yarn with a Sl St to first HDC furthest to the right in the last row of the coat top, Ch 10. (This is the side without the chain stitches) HDC in second Ch from hook, HDC in each Ch st (8 ch), HDC in same stitch where yarn was attached. HDC across and in each of the 9 Ch st created on the other side as you finished the Coat top area. Use St marker to find and mark the center of the HDC row you just completed. (This will identify where the button hole for the dog leash will go.)
Row 2- Ch 1, turn, HDC in first st, Ch 1, Skip st, HDC in each stitch across to the st BEFORE the st marker. Ch 1, skip that center st, HDC in next st and remaining st across. Button hole for fastening made, (Make sure it’s on the same side as the button holes in the Coat Body) and Center Button hole for the hook on the Dog’s collar to come through to attach the leash.
Row 3- Ch 1, turn, HDC in first st, HDC in Ch st, HDC in next st, HDC decrease in next 2 sts, HDC in each st across till you reach the center Ch st. HDC in Ch st, HDC in stitch across till last 5 st, HDC decrease in next 2 sts, 1 HDC in next st, HDC in Ch st, HDC in last st. Tie off and weave in all ends
OPTIONAL Decorative Trim:
Choose a Right Side of your project (button holes may be either on the Left or Right, but button holes on the left may be easier to button for a right handed person). Place coat in front of you with bottom edge at the top.
Using 6mm/ J hook, Attach contrasting yarn 7 stitches in from the right edge of the bottom of the coat. SC in each stitch around the entire outside edge of the coat putting 3 SC in each corner (4 corners on the widest area of the coat and 4 corners on the neck piece) (When going up the sides of the coat, use your judgement in placing the SC stitches taking care that the piece still lays flat. One stitch per row may be fine, but if it pulls in, you’ll need to add a few extra stitches. If it’s wavy, you need fewer.) Sl St into first SC created on bottom of coat. DO NOT tie off if creating a ruffle. Continue with ruffle instructions below. If not adding a ruffle, Tie off and weave in ends.
OPTIONAL Ruffled bottom edge:
With Right Side up and bottom of coat at the top as you look at it, place a stitch Marker 7 stitches in from the left. Switch to a 4mm/ G hook and continue with the contrasting yarn as follows:
Proceeding from where you Sl st with the contrasting yarn, Ch 3, 4 DC in SAME stitch, 5 DC in each stitch across to stitch before the stitch marker, 4 DC in the last stitch, Ch 3 and Sl St into SAME stitch. Tie off and weave in ends.

OPTIONAL Rosettes:
Using 4mm/ J hook and contrasting yarn:
Ch 15, 3 DC in 4th st from hook, 3 DC in each stitch till last 4 stitches, 2 DC in next 3 stitches, Sl St into last Ch. Tie off leaving a long tail
Letting rosette naturally wind around itself, use a few whip stitches to hold it together then sew around center button hole area on neck piece. Make 1, 2 or 3 depending on the size of your rosette or desired look. Attach to either side of the center button hole or one on each side, or one on each side and one under. One single rosette under is cute too
Finishing:
Weave in all loose ends and sew buttons on opposite side from button holes by lining up coat edges and marking where the buttons match the holes before sewing on. Be sure to use FLAT buttons for this project since your furry friend may be laying on them. Buttons with a shank or bulk would be too bumpy for your pet.
Demo Photos:
The demo pictures that follow are done in Loops and Threads Charisma Yarn in Cascade


Links for Matching Hat:
Because I wanted to quickly whip out a matching hat for Sunny’s Mommy…. I didn’t want to take the time to create a new pattern for one. I just used Lion Brand’s Free Lady Edith Hat pattern

Because my contrasting yarn was Caron Simply Soft in Berry Blue worsted weight yarn and not a chunky yarn, I had to adapt the brim pattern of the hat to make it work.
I joined the yarn and just used a SC stitch around (rather than an HDC as the pattern used), making sure to add some stitches here and there so the bottom hat edge didn’t pull in from the different weight yarn. (Use your judgement…. I didn’t take notes on this one folks and since I no longer have it in my possession, I can’t count the stitches 🙁 )
Repeat your SC rows around until you reach your desired length for the brim. (I think I counted 7 rows in the photo)
The flower is from a favorite pattern of mine by Sarahndipities you can find on Ravelry. The button is sewn on separate and the flower attached to the button. It makes it so that hat can be worn with or without the flower. I LOVE this pattern for both the Hat and the Flower, but you could really use any flower applique pattern you like! You’ll find plenty on my Pinterest page!

I hope you enjoy your cute Crochet Doggy Coat with Matching Hat! I will follow up with another post on how to adapt the pattern to a worsted weight as well as show you how to add some novelty yarn for a super fun look!
Thanks for stopping by!!

Be sure to check out my other great Hat patterns here at A Pattern To Follow like:
Three Quick Easy Crochet Hats for Winter
The Half Pike Gold Medal Beanie
Baby J’s Blacklight Hat


Hi. My name is Wanda also. I am a cancer survivor and love music and crafting. Just wanted to say hi and thanks for your sunflower pattern.
Hello Wanda!! How fun to meet another person with that name! I don’t know about you, but I grew up thinking I must be the only Wanda in world with the exception of the two aunts I was named after! LOL I finally found out that wasn’t true!
Thanks so much for reaching out! It seems we have much in common! I’m grateful you are a survivor of cancer! Not a fun thing to go through! And you are welcome for the Sunflower pattern! Even thought it’s not my design, it seemed many people needed help figuring out how to do it, so thanks for joining in on the fun!!