
Have you tried Planned Pooling Crochet? I ADORE it!! I probably spend far too much time doing it! Whenever I’m at the craft store now…. I’m always checking out variegated yarns and wondering which ones will pool nicely! I have far too many sitting on my shelf that I want to play with….. but I will get to them eventually!
The first time I tried Planned Pooling Crochet….. I struggled! I got one yarn to pool nicely for a while till all of a sudden, I looked down after about 12 inches of work and it wasn’t pooling correctly anymore! (FROG that one!!) Man….. I hated pulling out those stitches!! I wanted to cry! I tried another method with a different yarn and had the same experience. (Yep, FROG that one too!) <sniff> Though they both had tutorials on them…. the methods just weren’t working for me!
It wasn’t until I ran across Marly Bird’s tutorial on Planned Pooling that it finally worked for me! Now, I’ve tried several different colors with success and have become a little addicted to it!

While working on my latest Planned Pooling project, I felt inspired to make a list of tips that have helped me. I think it’s nice to have them in written form. Below are some of the tips I’ve found to be the most useful for me to make Planned Pooling Crochet successful. Hopefully these will help YOU conquer what can seem like a daunting task at first!!
Note: The tips below are based on using the Moss Stitch and following the method of starting your first row of the Moss stitch around the base chain rather than into the chain stitches. However, most of the tips will work with putting your stitches into the chain too. I’ve done it both ways. I like the idea of doing the Moss stitch around the chain because it makes the first row look like part of the design rather than taking a few rows for the design to appear, plus it makes a cleaner edge.
If you haven’t attempted Planned Pooling crochet yet, it would be helpful to go through the Marly Bird tutorial first. Follow it up by watching up her Tip #3 on another of her tutorials to show you how to do the first row of Moss stitch around the chain verses into the chain. Tip #3 starts at 3:50. The video link above will take you to a few seconds before that.
The tips below will enhance and re-emphasis what you learn there and hopefully give you a few more tips plus still photos to look at. Marly gives you great basics on getting started on Planned Pooling.
1—Keep the base chain as straight as possible as you do the first row of moss stitch around it.
It seemed a little more difficult for me if I let the chain twist. I found that if I move stitches along the chain as needed as you go. Don’t stretch it too much, as it can cause some rippling if you do.
2— It’s critical that you determine the number of stitches in each color on your first row and do it the same every time!
Your design depends on it being the same. Count your stitches in each color as you crochet around the base chain. You may have to adjust your tension a little as you go. Don’t do stitches that are half one color and half the next color. Loosen or tighten the stitch if needed to use up all the color so the next stitch will all be in the new color. Just be consistent in your stitch count!!
(My favorite hook sizes to use for Planned Pooling Crochet are a 5mm and 5.5mm)
NOTE: The more stitches you get in one color, the more bold and broad the pattern will be. Of course, this is also determined by the color of yarn you choose. You can always use a smaller hook to try and get more stitches per color if you desire a broader and wider look.
3—The first few rows are the most challenging.
Take your time to get it right on the first couple of rows of you project. The stitch color should shift to the left (or right if you’re left handed) by one on every row to obtain the argyle look. Things should move much easier after the first few rows. Hold your work out in front of you…… make sure those stitches are creating a diagonal line from row to row. You can use any small straight object to test with. Your crochet hook or a tapestry needle work fine.

4—Make sure the second row of stitches goes into the right spot.
A single crochet stitch will show 2 loops around the chain. Make sure that your next row of stitches after the base row are actually going into the chain space, not between the loops. I like to go along and pull the two loops of the single crochet together before I start the moss stitch on the second row.
That first row around the chain will actually be what you will look at for color shifts on your 3rd row, not the second. In other words, you will stitch row 3 based on colors in row one….. you will stitch row 4 based on colors in row 2…. continuing on like that shifting by one every other row.
NOTE: You are looking at the stitch you made AROUND the base chain to make your color shift on row 3. Don’t forget to count the first single crochet stitch that was made INTO the chain to secure it rather than around it.

5—Turns are SUPER important to get right and can sometimes be tricky.
If you don’t get the stitch in the right place at the turn, it will mess up the design. I like to count backwards in my colors on the row I’m about to start to make sure I know what color goes in that first stitch before I start stitching that row. That way I know if I need to pull out a few stitches and either tighten up my stitches, or use up more yarn before the first stitch is made. I can’t emphasis enough that if that first stitch color doesn’t make the correct shift…. the whole row will be wrong. It’s easier to make sure it’s right within the first 5 or 6 stitches than frogging the whole row because you didn’t double check!
NOTE: You are using the stitch colors in the second row down to determine the color of stitch needed for the next stitch, NOT the row you just completed.


6—It doesn’t matter if your stitch count is different than someone else using the same yarn.
Everyone’s tension and gauge is different. You need to use the hook that works best for you to be consistent in your stitch count. If you need to change hook size on a particular color to get the stitch count right, then do it. Keep your hook sizes sitting close by so you can easily change hooks if needed. For the most part, I have found that loosening or tightening stitches works fine for me without having to change hooks. Do what works for you.
7—FROGGING WILL HAPPEN! Don’t let it frustrate you!
Believe me…… I know!! When you first start to learn to color pool, it can seem frustrating to keep pulling out stitches. Most of the time, I found frogging will happen at the turns. As stated before…. the turns are important to get right. If you get the first 4-5 stitches correct at the turn, the rest of the row is a breeze! (Though I always glance down to make sure it continues that way throughout the row.)
I’ve found that once the turn is correct, the easiest way to check your work as you go along, is to look at the stitch directly below the one you just did (two rows down of course) and know that whatever color that stitch is in that second row directly below the one you just did, dictates what color the next stitch should be. For me, that’s the best way to make sure the colors are shifting by one.
8—Sometimes making sure the right color stitch is in the right spot can be a little more difficult to tell when you are in the areas where the same color clusters together to form a diamond.
If your row was started correct, it should work out. When the color cluster is at the turn, it can be frustrating. I found many times that I may have to FROG my work a few times even though it seemed right. It’s OK! FROGGING HAPPENS! Just count several colors back to get it right if you have to.

9—DON’T GIVE UP!

If you need to walk away for a while because you’re frustrated….. then do it! Take a breather. You may need to try another color of yarn. Maybe the one you’re trying either doesn’t pool well or may be more difficult to see color changes. I know when I work with the darker colored yarns, it a little harder to see. Especially when the colors are not a dramatic color switch. Watch the Marly Bird tutorials on YouTube. She’s brilliant in her explanations. Those are the videos that finally made things start happening for me!
10—There is more than one way to do Planned Pooling Crochet.
Maybe Marly Bird’s technique is not the best for you. There are other methods and tutorials out there. Try them. I just found this method works for me. I have read articles and seen videos about charting out your design. There are tutorials about that on YouTube. If charting it out works for you…. then do it! Personally, I don’t like the extra time it takes to do that. The above tips are things I’ve observed while doing Planned Pooling crochet that seem to work well for me. Guys, I am by no means the expert on Planned Pooling…. but I have learned a lot while doing it. That’s what I’ve shared with you. The tips that work the best for me.
I found a great resource on the Red Heart Yarn website with tons of references and direct links to tutorials and Red Heart yarns that work for Pooling. Check it out.
Bonus Tip #1:
If you haven’t already done so….. join the Planned Pooling with Crochet community on Facebook! You’ll find LOTS of fellow crocheters there with tons of answers and questions on Planned Pooling, just like you! And you’ll see some really COOL projects they’ve done! So much fun!
Bonus Tip #2
If you’re dying to try multiple skeins of yarn at the same time for Planned Pooling like I was…. I have a few tips for you to keep your projects straight.
I have found an easy way for me to track my projects is to use the paper skein wrap to write down the hook size I used and the number of stitches in each color. I like to slide the skein covers off the yarn to keep them in tact when I start a project rather than tearing them off. That way I easily know the yarn brand, name, color and dye lot I’m working with. By the way…..Make sure you’ve purchased enough yarn in the SAME dye lot to complete your project! That’s a VERY important fact for pooling! Better to have extra, than not enough. If you use a different dye lot, the color sequence or length of color could change and mess up your design!

The way I like to store my project when not working on it, or while I go onto the next one, is to roll the project around the skein of yarn and then slide the skein cover back over it.

That way the yarn stays in tack and all my instructions for the project are right there. Obviously, this technique wouldn’t work for a larger project like a blanket, but it works nicely for scarfs and some hats. I would strongly suggest making a scarf or small project for your first Planned Pooling project. Seeing that pattern come together quickly on a smaller project is rewarding and makes you want to keep going.

It may seem like that technique would be a little bulky to try and put the skein cover back on, but I’ve found that as the skein of yarn size reduces as I crochet, the project itself seems to take up that room that was there and still fits into the wrap nicely.

My biggest advice here is to make sure you note the hook size used and number of stitches in each color somewhere!!
Well fellow crochet buffs…. I hope you’ve found this article useful! If you haven’t tried any of these tips…. give it a whirl! I think sometimes seeing them in print can help the tips stick a little better. Let me know if they’re helpful to you! If you have another way that works for you…. post it in the comments! I’d love to know! Let’s share techniques with each other on this fun (and slightly addictive) crocheting technique!
I’d like to give a huge shout out to Marly Bird for the recognition of THIS post in her new post Total Beginners Guide to Planned Pooling Crochet Check it out for even MORE tips for planned pooling!
I hope you’ve found some tips to help you Conquer Planned Pooling Crochet and have another Pattern To Follow! I wish you much luck in your projects! Happy Frogging!!! <grin>
P.S. Don’t forget to hop on over and check out my other post using this same color pooling technique for a hat!

Thank you for supporting this site with purchases made through links in this article
Here’s a list of some of yarns I’ve personally used so far that work for Planned Pooling:
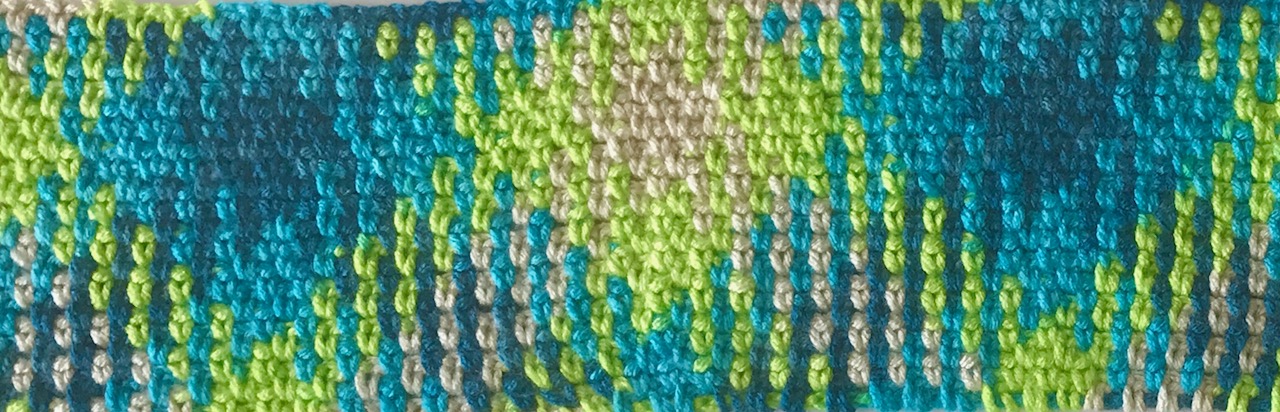
Caron Jumbo in Seaside Ombre (the color used in most of the above photos)
I Love This Yarn in Retro
I Love This Yarn in Peacock
Loops and Threads Impeccable in Fresh Lilac
Red Heart With Love in Lemon Drop (This color is hard to come by sometimes…. I found mine at Walmart!!)
Red Heart With Love in Delightful
Red Heart Super Saver in Pink Camo
Red Heart Super Saver in Zebra


I love to crochet and haven’t tried this yet. Thanks for the easy to follow instructions! I know I’ll be checking out your photos a few times to make sure I’m doing it right.
I’m so excited for you to give this a try!! It’s so much fun! I hope you find this post helpful when trying it. I’d be happy to try and help you through any rough spots! Thanks for stopping by!!
Please list your yarn company and names.
At the bottom of the blog post is the list of the yarns I have used and also a few hot links to some of the ones in the photographs. I usually get my yarn at JoAnn, but have purchased at Michael’s, Hobby Lobby and even Walmart! LOL The I Love This Yarn! brand is a Hobby Lobby brand and only available at Hobby Lobby. Thanks for checking out my post!
Thanks for the shout out Marly! Thanks to you for helping me learn this in the first place!