
The first time I saw a planned pooled scarf on Pinterest, I went a little crazy! “That is so cool,” I thought! “I want to do that! How hard is it?” I started looking around on some of the sites that were posting Pins with color pooling. I watched a few tutorials and and felt like it was something I could tackle, so I went out and bought a couple of skeins of variegated yarn that seemed to meet the specifications that the videos were telling me. It didn’t come together as easily as I had hoped! It wasn’t until I watched the Marly Bird Best Crochet Planned Pooling tutorial on planned pooling that I was able to get some success. I would also recommend watching more of her planned pooling videos. Especially the 10 Secrets to Planned Pooling tutorial. (Be sure and check out my post 10 Tips for Conquering Planned Pooling Crochet for some more tips.)

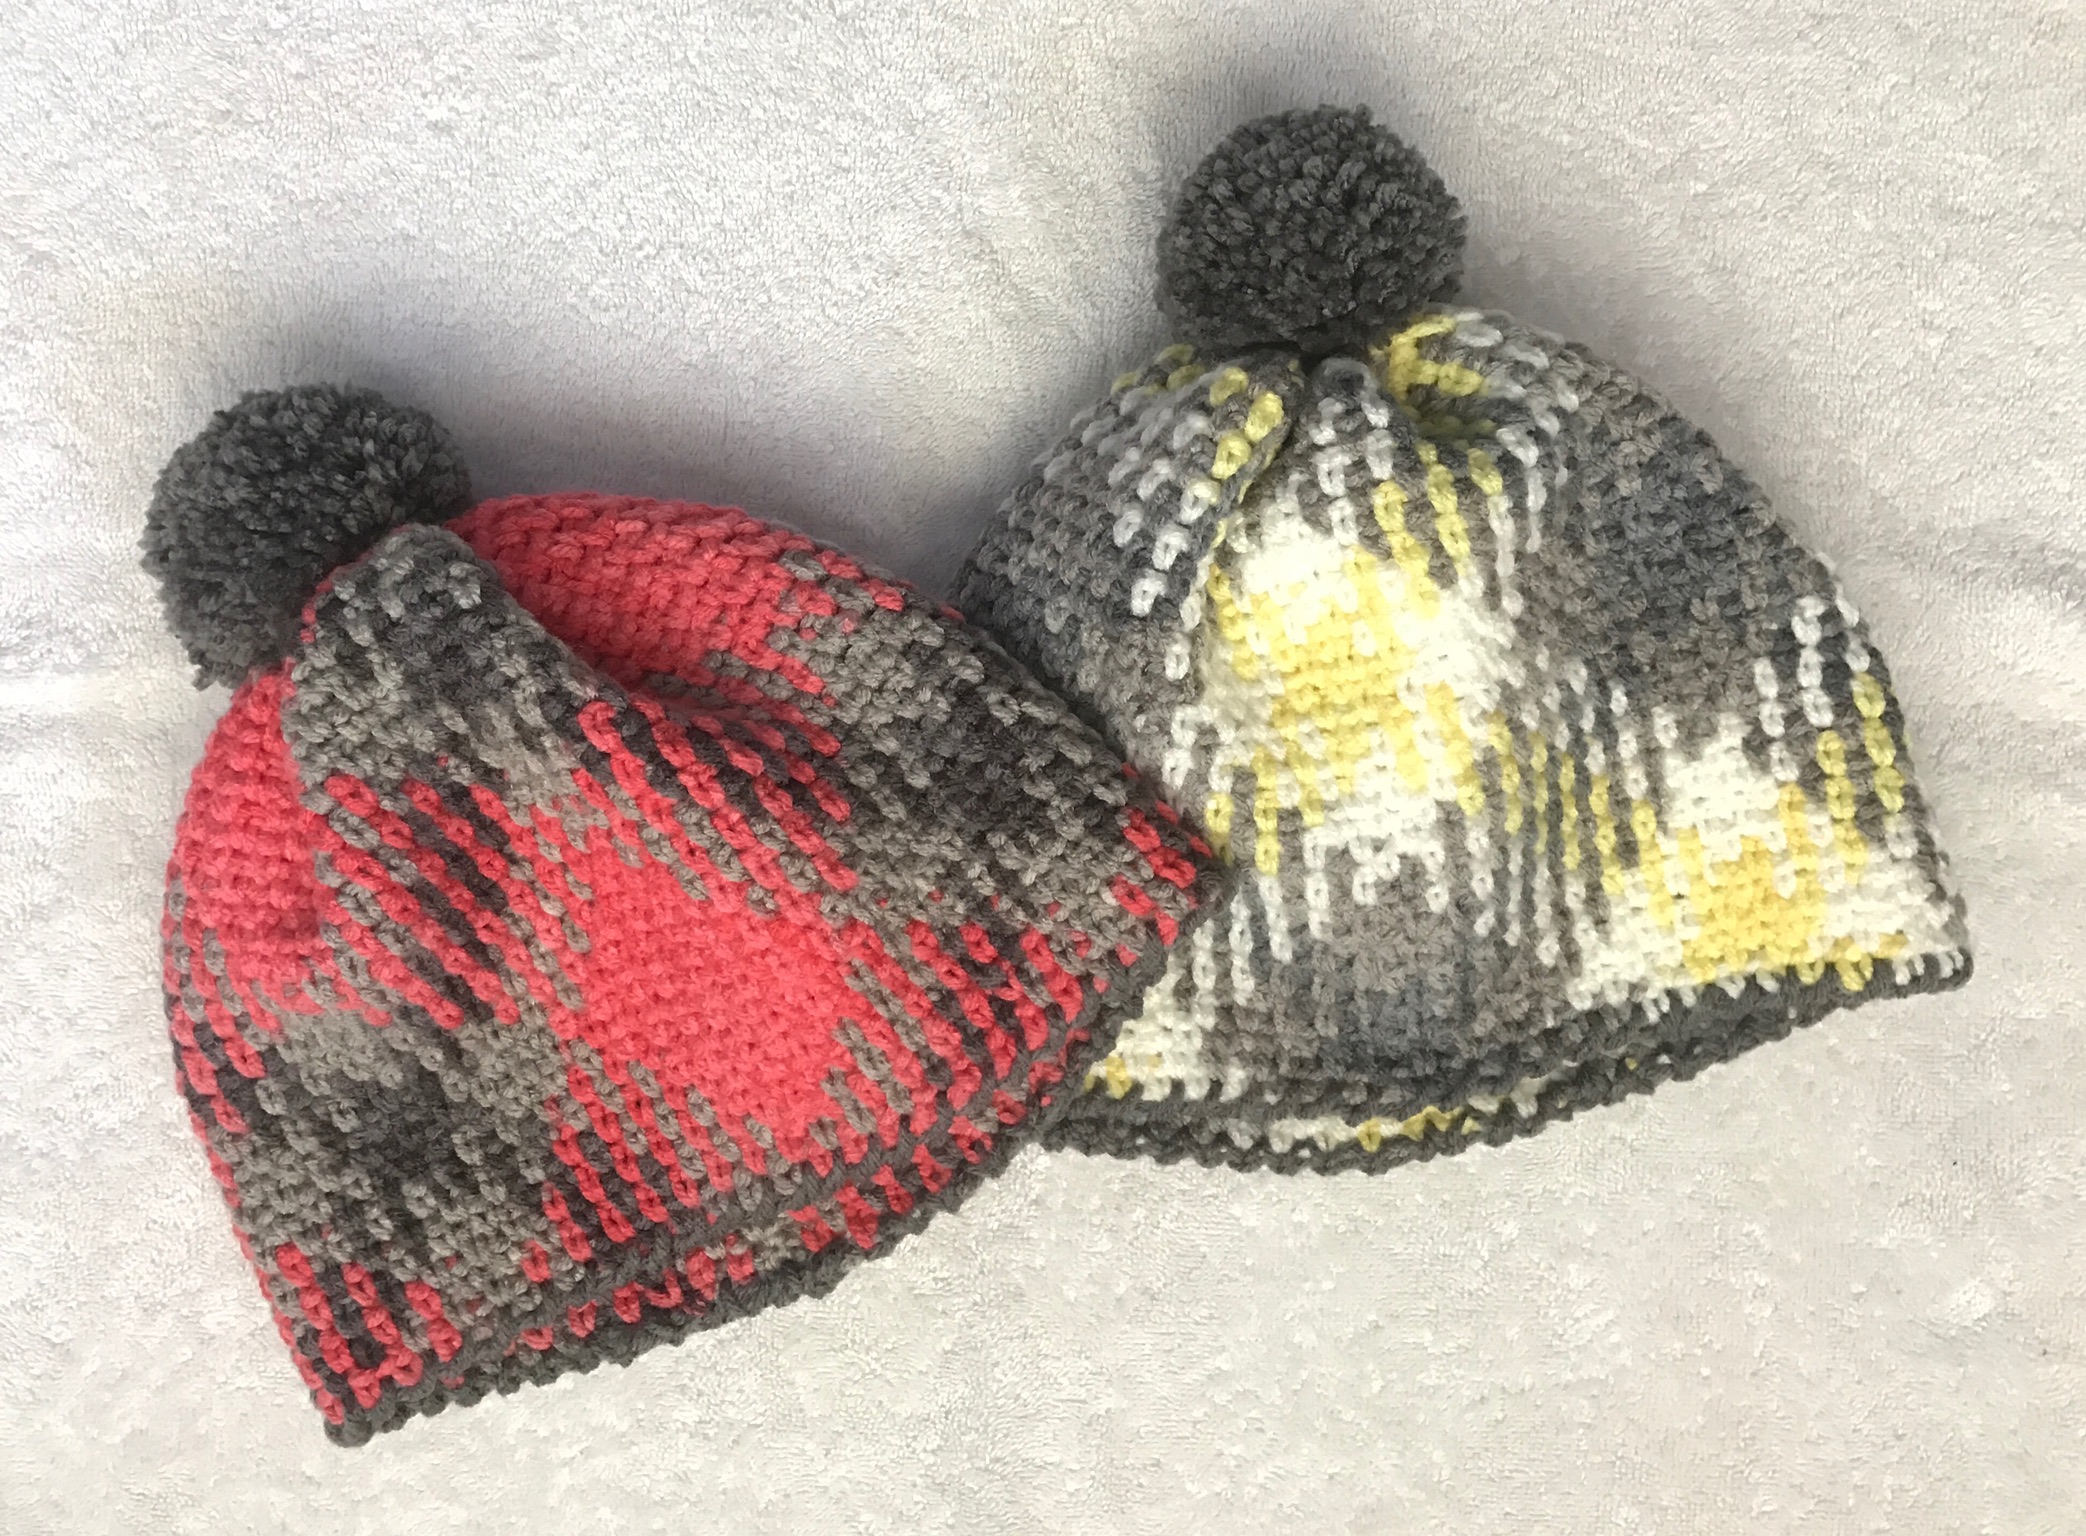
I was working on a few scarfs, which I will refer to in another post, when I saw the new Red Heart Planned Pooling Argyle Hat (Pattern LW5587) come up on Pinterest…. then I went even a little more crazy! Since most of what I crochet is hats to donate to cancer patients, this pattern had me excited!! I went out and found some yarn and decided to use the recommended yarn in the patter. I picked up Red Heart With Love in Delightful and in Lemon Drop.
I started with the Delightful yarn for the first hat. This yarn has a color sequence with a long piece of coral yarn. I was worried it wouldn’t pool correctly since most of the video tutorials I’d seen on pooling said no one color should be longer than 12″ But, It pooled beautifully using the Marly Bird technique! In fact, after I went back to review her videos, I realized she had used that yarn in one of her demos!

I love the large diamonds that the coral color created. I also loved the sharp contrast of the colors used. When I made the second hat using the Lemon Drop, I found that it was a little hard to see the color change between the light gray yarn and the dark gray yarn. I would recommend using a variegated yarn with very sharp color changes and bright colors for the first few times you try a planned pooled pattern. It’s much easier to count your stitches and see the changes.

The pattern calls for chaining three repeats in the color sequence. For my first attempt, I thought I try the traditional method of starting the moss stitch in the chains rather than doing it around the base string of chains as the pattern suggests. When I did it with the moss stitch in every other chain, three repeats seemed WAY too large for a hat so I decided to try only two repeats. With just the base chain row done, and the first row of moss stitch, two repeats seemed to fit around my head with a little stretching, so I figured it was fine. But after working the pooling for about 4 inches, I realized it was not long enough to go around my head! Doing the stitches for several rows pulled the work tighter and the initial length ended up too short. It wouldn’t even go around my grand daughters head, so I knew I needed to FROG the whole thing and start over!!!

This time, I followed the pattern and did the three repeats with the moss stitch done around the base chain. I guess Marly knew what she was doing when she designed the pattern. <blush> I did have a lot of trouble with that base chain twisting and turning on me with the first row of the moss stitch, particularly on the second hat I made. In fact, I redid the first row a couple of times to try and be more careful about not letting the chain twist as much. However, once you’ve crocheted a few rows of the pattern, you can squish or stretch the stitches more evenly on the base chain as Marly explains in her Finishing area on the pattern, which helps to straighten that chain out. However, I would suggest paying close attention to how Marly is holding her base chain in Tip #4 of the 10 Secrets video. I will definitely be more careful the next time around with this technique.
Here are a few other observations I found on making this hat.
I ultimately ended up using a 5mm hook to make getting the correct number of stitches easier. Of course, that will depend on the yarn you are using and even the dye lot. I played with a 6mm as the pattern calls for at first, but both shades of yarn I used worked better using a 5mm hook.
I prefer making sure each color has at least 3 moss stitches in each color. More is even better. It makes a much cooler looking pattern. Using the 5mm hook made it easy to keep consistent with the stitches. I did have to adjust my tension on certain colors to make that happen, but it was easy to do and got to be fairly repetitive, so that I knew what colors to tighten and which ones to loosen. It will all depend on your yarn as to which hook(s) work out the best.
The hardest part to making color pooling work out right are the turns. Marly does a great job of showing you how sometimes you may need to really tighten those stitches, or other times actually use up more yarn by doing a HDC or other creative stitches to use up yarn. See Tip #7 in her 10 Secrets video. I found that if I carefully made sure that the stitches were in the correct place for the first few stitches on each row, I really didn’t need to worry that the rest of the row would work out, as long as I was using the correct number of stitches in each color. I did, however, always glance down during the row just to make sure, but it was always correct as long as that turn was right. Besides…. it’s fun to admire what is happening before you eyes!

Because I donate most of my hats to cancer patients, I made this pattern a little bit longer than the 7″ height suggested in the pattern. I made my hats from 8″- 9″ long before I started shaping the crown.

Having been a cancer patient, I always liked my hats tall enough to completely cover my neckline and ears. I think most cancer patients feel the same, so therefore, I make sure my hats are longer. I think you could even turn this pattern into a slouch hat if you went even longer. However, it would require a second skien of yarn in the same dye lot to do that. I didn’t have a lot of yarn left taking it to 9″.
The awesome thing about this pooling technique for a hat is that the design should match in the back making the seam almost disappear!!! However, I found that when stitching down the back, it’s important to make sure the color of yarn you are stitching with matches the color of stitches you’re are whip stitching through. That required me on occasion to make a knot at the end of a color, pull the yarn through till the right color was there for the next section and then make a knot there too so the yarn wouldn’t slip.

Once I finished stitching the back together, I could go back a snip the yarn after the knot I had made and weave it in so there were no long threads hanging inside the hat.
When finishing the edges, I went back to a 5.5mm hook to do the crab stitch around the bottom of the hat. I’m sure a 6mm hook would work too. I liked the crab stitch looking bigger. It’s a great edge for the hat. I used Red Heart With Love in Pewter to do the trim on both hats.

I like using a Pom Pom maker to make the Pom Pom to finish the hat off. As long as you are fairly consistent with the amount of yarn you wrap around both sides, they turn out pretty even and don’t need a lot of trimming.
What a fun hat!! I really like this pattern and will probably make more! Get out that yarn and hook and tried some Planned Pooling Projects!
I hope you now have another Pattern To Follow!
DON’T FORGET TO CHECK OUT MY POST ON 10 TIPS FOR CONQUERING PLANNED POOLING CROCHET!

This post contains affiliate links, which means I receive a small commission, at no extra cost to you, if you make a purchase using this link


